

Attention: EveryAction is now Bonterra CRM. Please bear with us as we update our screenshots to match our new name.
(3 min read)
When you are working on Direct Mail acquisition efforts, Finder Files provide a way to keep rented and exchanged names and addresses out of your house file but make it easy to add new acquisitions to your records as they respond to your efforts.
The file is provided by your list broker, who will assign a unique number for every name that was sent the acquisition mailing. You can use these numbers to automatically add names, addresses, and other information from the list into your records once a prospect responds to your acquisition mailing.
Before you begin your acquisition effort, make sure that you are using Eliminator Files to ensure you are excluding your existing contacts from your effort.
Read more on Eliminator Files
Uploading your Finder File
After you have created a Direct Response Plan for your mail acquisition effort, your list broker will need to transmit your finder file to Client Services as an Excel spreadsheet or comma-separated file.
Fields with an asterisk are required for the file to upload. If you choose not to include data for any of the other columns, delete them before sending the finder file.
-
FinderNumber*
-
FirstName*
-
LastName*
-
Acquisition List ID*
-
Source Code ID*
-
Address Line 1*
-
Address Line 2
-
Address Line 3
-
City*
-
State*
-
Zip5*
-
Zip4
-
Salutation
-
Prefix
-
Suffix
-
Professional Suffix
-
Employer
Download this template as a guide to format the data >> upload-finder-file-template.csv
We will also need to know:
- the name of the direct mail acquisition effort you want this finder file to be associated with; and
- what date the finder file should expire, based on the agreement you have with your list broker (our system default is two years from the date of upload).
Once we receive your request, we will add the finder file to your account as a shadow table that is not directly visible from Bonterra CRM. You won't be able to go in and change any of the information provided by your list broker, but you will be able to pull contact names and addresses from the file as you add new contributions.
Use Finder numbers with individual contributions
If you are entering individual contributions manually, you can automatically add the new contact information using the finder number.
Go to the Financial Batch Manager page and select the batch you wish to work on. Choose Add Individual Contribution. Search for the finder number.

If the finder number is located, you can choose that contact to populate the form with the Name, Address, and Source Code from the finder file.
Enter the donation details as usual and save the contribution. Your donor information from the finder file with their associated contribution has now been added to your EveryAction account.
Use Finder numbers with Bulk Upload
If you have a large number of donors you want to add to your Bonterra CRM account using the finder file to automatically input addresses and other details, select Load new contacts directly in the Bulk Upload Wizard. Be sure that the new file you are uploading includes a column for the finder number.
Since you'll be pulling names and addresses from the finder file, there is no need to include those columns in your Bulk Upload file. This has the advantage of saving you keystrokes on data entry. You can simply type the finder number into your table, add contribution amounts or any other information you need to track, and then pull the names and addresses from your finder file when you upload the information to EveryAction. There is no need to enter that information manually.
If the finder number column in your bulk file is labeled FinderNumber, the system will automatically map it to the correct field from your finder file. Otherwise, once you've uploaded the file, you can use the mapping feature to map the column you are using for your finder numbers to the correct field in your finder file.
You can also use the Mapping Template to associate other values from the finder file, such as contribution information, with fields from the file you uploaded.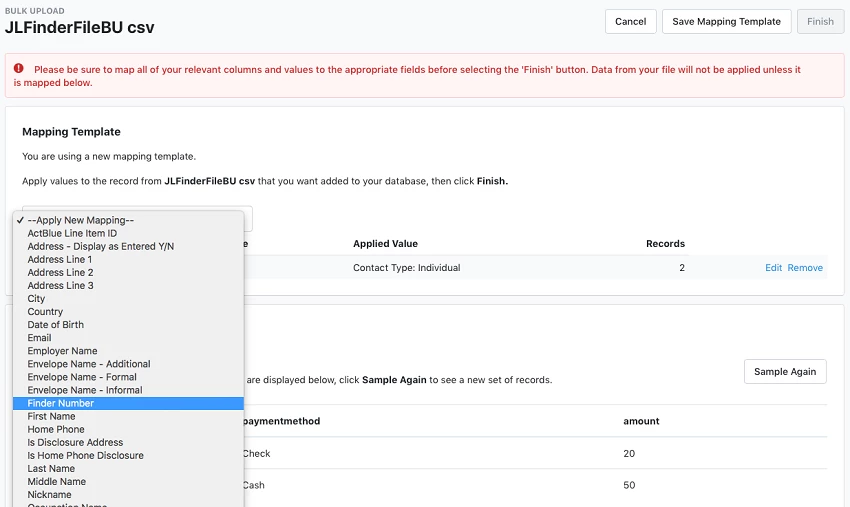
Once you've completed your mapping, you should receive a confirmation message that this field was mapped correctly.
You should save this Mapping Template. Once you are done with the mapping, click Finish to run the import. Your donors and their contributions have now been added to your Bonterra CRM account.