

Selecting a sending address
Targeted Email requires that you send from an address that can receive emails and that uses a unique domain name that you own. You will not be able to use “freemail” services like Gmail or Hotmail to send your Targeted Emails.
If your organization does not yet have a domain name, you can purchase one from services like GoDaddy, Namecheap, and so on. Once your domain name is created, you’ll be able to continue with your Targeted Email setup.
Understanding email domain connections
To begin using Targeted Email, you will need to give us permission to send from the domain that you plan to use. You'll only need to go through the setup process once, unless you later need to change or add a domain. (Sending from more than one domain can potentially hurt your deliverability and sender reputation, so it’s not a generally recommended practice.)
You can make the connection by adding us to your SPF and DKIM records for your email domain:
-
SPF, or Sender Policy Framework, is a generic approval you can add to your domain to approve certain groups to send on your behalf. SPF records allow recipient email services (like Gmail or Apple) to verify that messages being sent on your behalf are using an approved IP address.
-
DKIM, or DomainKeys Identified Mail, is a digital signature at the top of every email sent. This helps recipient email services verify that the message is legitimate by matching the DKIM record we attach when we send emails on your behalf to the DKIM record you’ve added to your domain.
Both SPF and DKIM are used in tandem to ensure that your emails are legitimate and not a phishing attempt. Failing to pass an SPF or DKIM check could mean your emails are more likely to end up in the spam/junk folder.
After you’ve set these up, you can then verify the settings and register your domain with our system as described below.
DMARC is another way to authenticate your email senders. This option tells recipient email service providers how to handle emails that fail either SPF or DKIM checks. It provides a robust level of security to your email send but it’s the least used of these three deliverability settings because setting it up improperly can cause more harm to your deliverability than not using it at all. If you decide to set up a DMARC record, please exercise caution.
Editing your domain records
Log in to your domain hosting account so you can add or edit the information below directly in your email domain records.
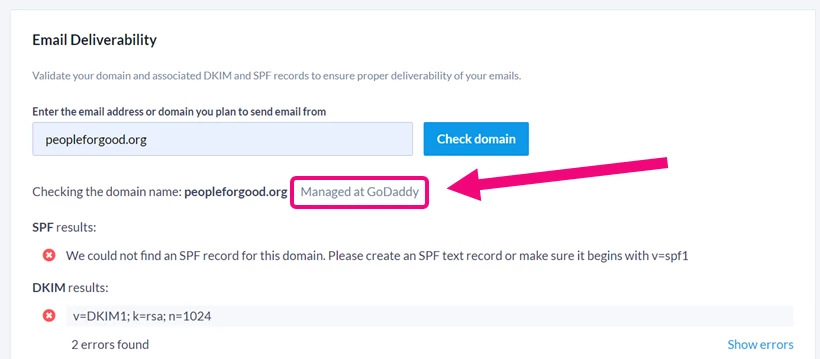
If you aren’t sure who hosts your domain, you can run the registration verification process from the Targeted Email > Settings tab (described in the verification step below) even before you set up your DKIM and SPF records. You’ll see a warning message since your records aren’t set up yet, but you will also see the name of the hosting provider for that domain.
If no provider is found, you can also look up your domain at whois.com to find the name and email address of the administrator for your domain.
Once you’ve logged into your domain hosting account, you will need to follow your provider’s instructions to edit your SPF and DKIM records as described below. Since we don't manage the hosting of your organization's domain, our support staff are unable to assist you with editing these records.
Adding an SPF record
In your domain hosting account, you will need to create or add an SPF record that points to our domain. Follow your domain provider’s instructions and create a new TXT record with the following information:
Host Value: @
TXT Value: v=spf1 include:_spfprod.ngpvan.com ~all
If you use multiple senders, you can just add our information to the record that already exists:
Example #1:
You use the yourorganizationsdomain.org email domain (e.g.info@yourorganizationsdomain.org) and send email from G Suite and our products only. Add a TXT record for yourorganizationsdomain.org with the following value:
v=spf1 include:_spf.google.com include:_spfprod.ngpvan.com ~all
Example #2:
You use the yourorganizationsdomain.org email domain (e.g. info@yourorganizationsdomain.org) and send email from Microsoft Office 365 and our products only. Add a TXT record for yourorganizationsdomain.org with the following value:
v=spf1 include:spf.protection.outlook.com include:_spfprod.ngpvan.com ~all
Creating a DKIM record
To add your DKIM record, you will need to create another new TXT record in your domain settings and add the text below. Make sure to replace yourorganizationsdomain.org with your own domain name.
Host Value: ngpweb3._domainkey.yourorganizationsdomain.org
TXT Value:
v=DKIM1; k=rsa; n=1024; p=MIGfMA0GCSqGSIb3DQEBAQUAA4GNADCBiQKBgQD+FZRWRvxNzHH8gasWTJi4+bWRyDSMgEI7XOwAzUyrrvwz4QZ4lDtOwQVAmkqxUiyf5YkufT6+5h15wmR0f82JwqwT1vMjOUNS/Kausds5aBJiu2GFsIFrwXBUFf2Hp81yRzWQ56XoP+QTYJDk7Q3NRRGg17QfOZSDfPZCMICFVwIDAQAB
Important Note: If you use GoDaddy or your DKIM doesn’t validate properly, there’s a chance your domain provider automatically adds your organization’s domain to the end of the DKIM host value which causes the DKIM record to no longer align. If you run into this issue, change the host value to just ngpweb3._domainkey.
Verifying your settings and registering your domain
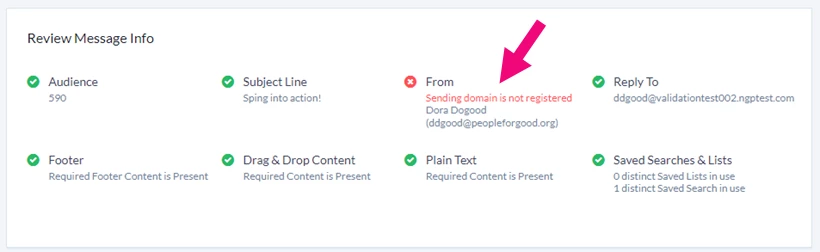
Once you’ve set up your DKIM records, you will need to verify your settings and register your domain with our system before you can begin sending. If you haven’t done this step, you will see a warning on the Review step for any emails you try to create.
If you have administrative permissions in Targeted Email, you will be able to verify your DKIM settings and register the domain from the Settings tab in Targeted Email.
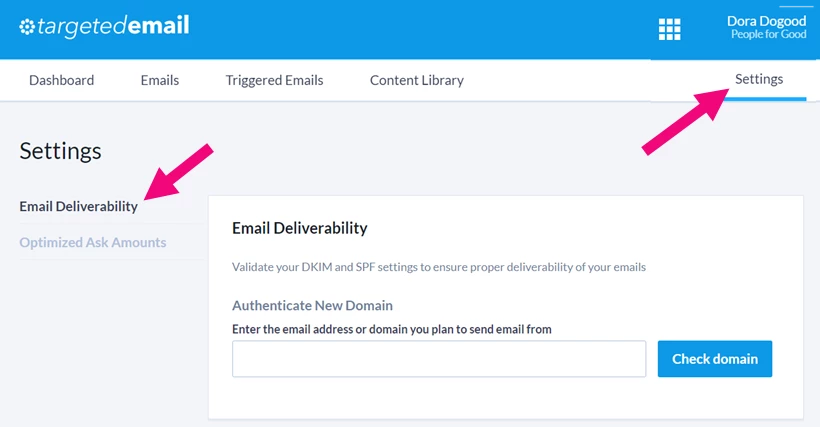
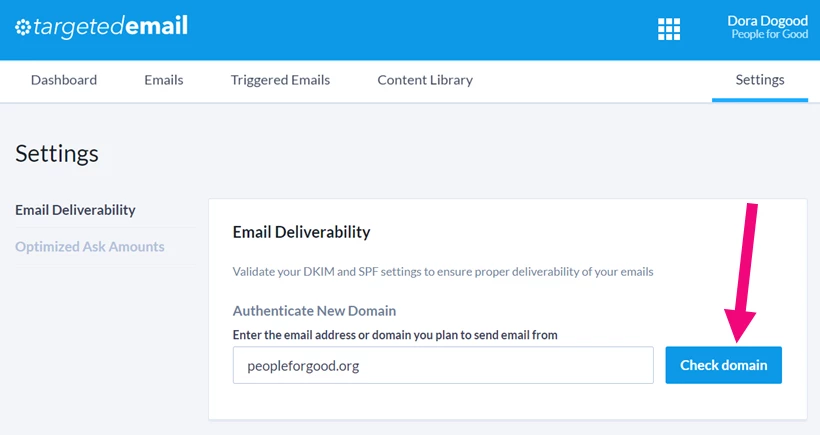
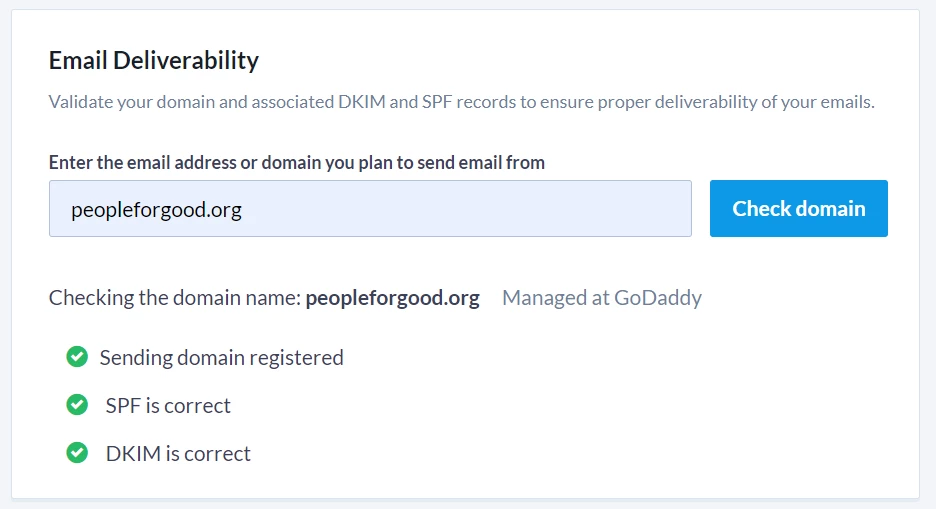
Enter the domain name and select Check domain.
This will run a check on your DKIM and SPF records. If your SPF and DKIM records have green checks, you can then Register your domain.
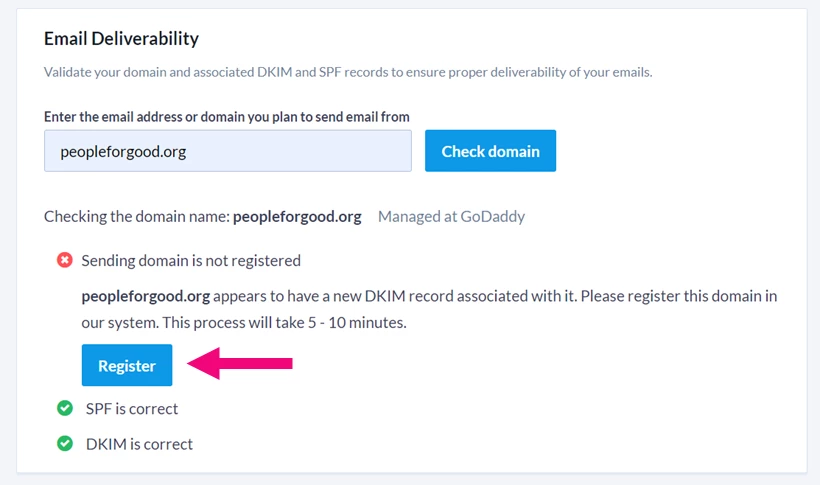
Once it’s approved (usually around 5 minutes), you can verify if the registration went through by clicking the Check domain button again. Once you see green checkmarks, you’ll know that all your settings are correct and that the domain is registered.
You should now be ready to begin sending Targeted Emails from your new domain.
Looking for training?
Explore this feature at your own pace - join a live training session or watch a recorded webinar by clicking the link below.