When a donation is received, you can manually record it in a donor’s history for accurate tracking and reporting.
Step 1: Manually add a contribution from the contact record
When receiving a donation outside of an online form or integration, you can manually add the contribution directly from a contact record.
- To manually add a contribution, open the donor’s contact record using the Contacts search.
- In the Financial tab, click the add button and select Contribution.
- Enter the required details—amount, date, payment type, and source—along with any optional fields like check number or fund.
- Click Save, and the contribution will appear in the Financial tab.
Step 2: Review other methods for adding contributions
There are several ways to add contributions to your database:
- Use Financial Batch Manager to add batches of contributions.
Read more about adding contributions to Financial Batches. - Enter contributions individually to a batch using Quick Entry.
Read more about Quick Entry. - Add contributions to several contact records at once using Bulk Edit or Bulk Upload.
Read more on bulk editing contributions. - Contributions are automatically added when someone submits an Online Actions contribution or ticketed event form.
Step 3: Understand editing and deleting contributions
If necessary, you can edit or delete a contribution, as long as it has not already been "Posted" or submitted to a payment processor. Once it has been posted or submitted, you will need to "Adjust" or "Refund" the amount and enter a new contribution record for the correct amount.
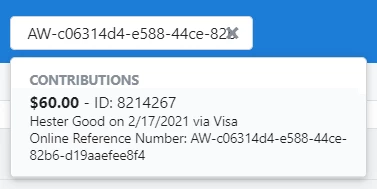
Step 4: Search for a contribution
When you need to locate a particular donation, you can quickly find a specific contribution by searching for its unique identifiers, such as a Contribution ID or Online Reference Number.
-
Online Reference Numbers are automatically generated when a donor submits an online form. They appear on the donor’s Thank You page and confirmation email, making them easy to reference for follow-up or verification.
Use the Global Search Box
-
To quickly locate a specific contribution, enter the Contribution ID or Online Reference Number into the search box in the upper-right corner of EveryAction.