


How do I create and manage Programs in my Organization profile?
Programs are a dedicated section of your organization’s profile in the Bonterra Nonprofit Hub where you can document the specific initiatives, services, and areas of work your nonprofit operates. Adding Programs strengthens your profile and plays a direct role in improving the quality of your grant matching results in Bonterra GrantMatch.
The following steps will guide you through accessing Programs in your Nonprofit Hub organization profile, adding new programs, using program suggestions from Que, and keeping your program information current.
Step 1: Access your Organization profile
Log in to your organization’s Nonprofit Hub account using your Bonterra credentials. From the Nonprofit Hub home page, navigate to the left side panel and enter your organization profile to view the dedicated Programs section.
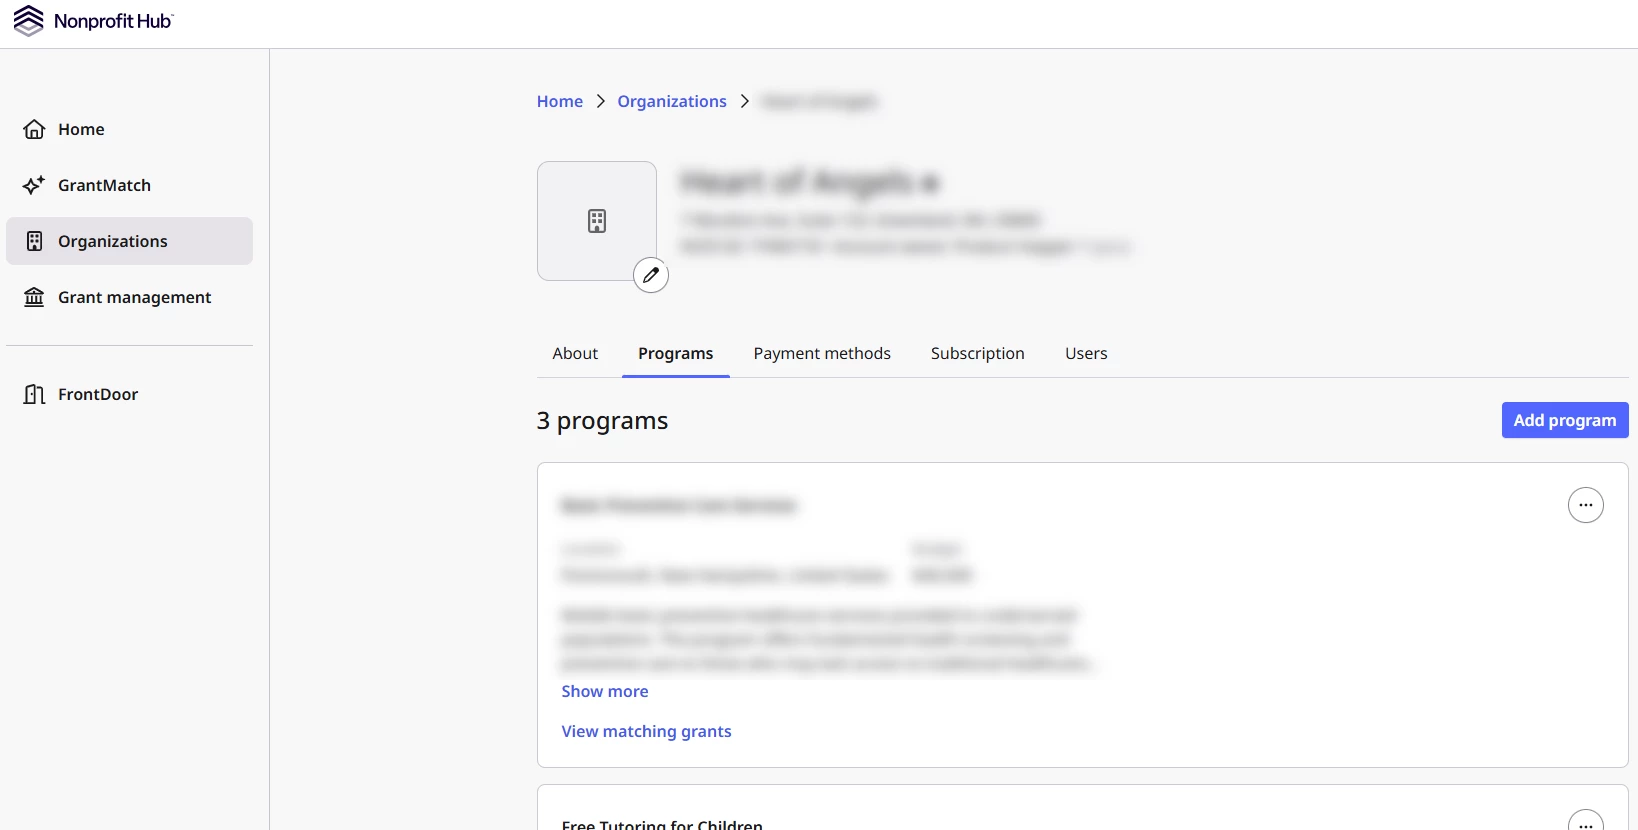
Verified owners and members with permission to edit the organization's programs can make updates in the profile. To access and edit Programs, you will need either the Owner role for your organization or a member account that has been granted permission to edit the organization profile by an Owner. If you can view the profile but cannot make edits, contact your organization’s Verified Owner to request access.
Step 2: Understand what a program is
In the Nonprofit Hub, a Program represents a specific initiative, service area, or funded work stream that your organization operates. Programs are distinct from your organization’s general mission—they represent the concrete activities and services your team delivers on the ground. Examples of Programs include a youth mentorship program, a food pantry and distribution service, job training and workforce development, an after-school tutoring program, or a housing stability assistance initiative.
Programs matter because GrantMatch uses them directly to surface more relevant funding opportunities. When you select a program within the GrantMatch workflow, the tool identifies grants that align specifically with that program’s focus, populations served, and geographic location—rather than relying only on your organization’s general profile. A well-documented Programs section helps ensure that the grants surfaced in GrantMatch reflect what your organization actually does.
Step 3: Use Que to generate program suggestions
If you are not sure where to start, or if you want a head start on identifying programs your organization likely operates, use Que to get program suggestions based on publicly available information about your organization, including your website. This is especially useful if your profile is incomplete or if you have recently joined the Nonprofit Hub and have not yet added program details.
Que is there to make program discovery easier so you can focus on your mission, not data entry.
To see what Que recommends, access the Programs tab from your Organization’s profile and, scroll to the bottom, below your existing programs, to view Que’s program suggestions. You'll see a list of suggested programs from Que based on your organization's name, mission, and publicly available information. For each suggestion, you can take one of the following actions:
- Dismiss - Decline the suggestion if it does not accurately reflect a program your organization operates. Que tracks dismissed suggestions so that the same program is not suggested again in future sessions.
- Edit - Review the suggestion and modify the name, description, location, or budget before saving. This is recommended when Que’s suggestion is broadly accurate but needs refinement to match your organization’s specific terminology or focus.
- Keep - Keep the suggestion and add it to your Programs list. A kept suggestion becomes a program record in your profile and will be available for use in GrantMatch.
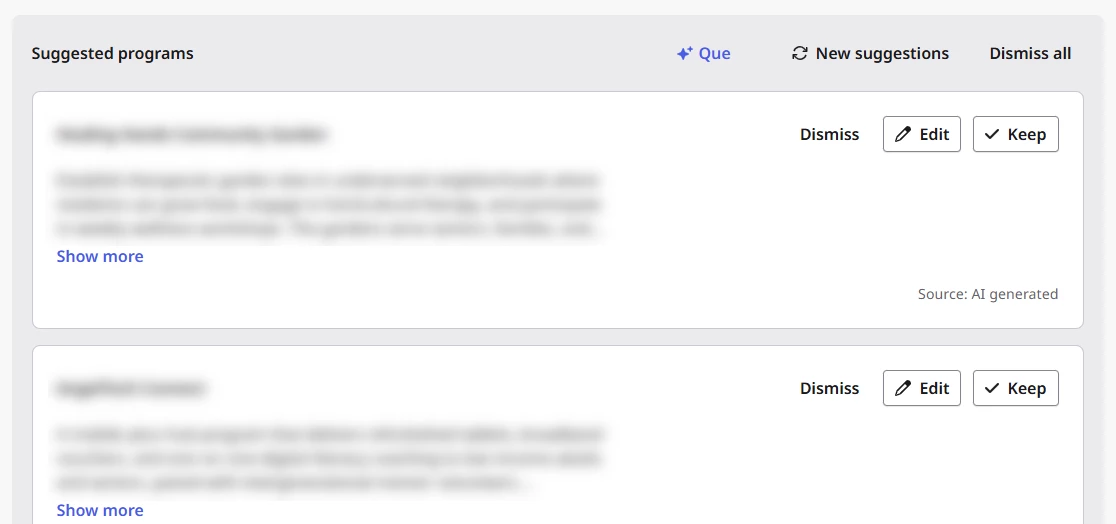
You can request additional suggestions if the initial list does not fully reflect your organization’s work. Que will generate “New suggestions” that do not repeat previously dismissed programs.
Note: Que’s program suggestions are based on publicly available information and may not perfectly reflect your organization’s current programs. Always review suggestions before saving, and edit any details that do not accurately represent the program as your organization delivers it.
Step 4: Add a program manually
Select the option to “Add program” from within the Programs section of your organization profile. A box will appear with the following fields to complete:
- Program name - Enter the name of the program as your organization refers to it internally or publicly. Be specific enough that the name accurately reflects the work—for example, “Homeless Youth Outreach” is more useful than “Outreach Program.”
- Description - Provide a description of what the program does, who it serves, and what outcomes it aims to achieve. A clear, accurate description is one of the most important inputs for grant matching, as it is used to evaluate how well your program aligns with funder priorities and grant requirements.
- Location - Indicate the geographic area where this program operates or delivers services. This can be a city, county, region, or state. Location is used to filter grants with geographic eligibility requirements, so the more accurately you define your service area, the better your matches will reflect opportunities your program is actually eligible for.
- Budget - Enter the approximate budget for this program. Budget information helps GrantMatch assess alignment with grants that specify minimum or maximum award amounts or that target organizations operating at a specific funding level.
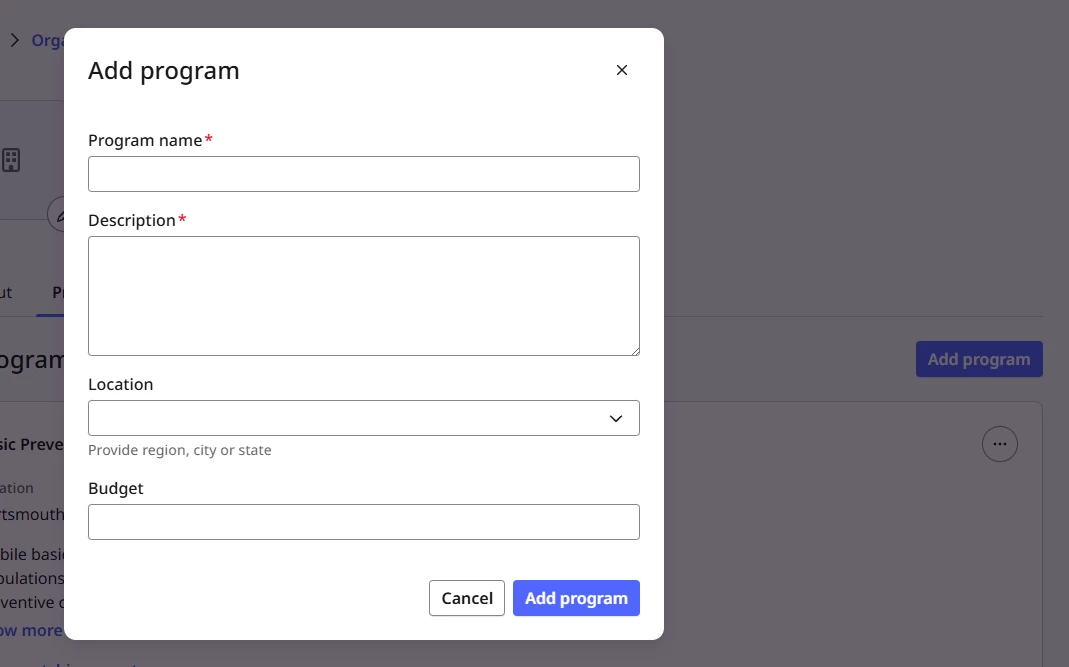
Once you have completed the fields, click “Add program” in the box to save the program. It will appear in your Programs list and will be available for selection in GrantMatch.
Step 5: Review and Refine Your Programs
After adding programs—whether manually or through Que suggestions—review your full Programs list to confirm that each entry accurately represents a current, active program your organization operates. Consider the following as you review:
- Each program name should be clear and specific enough to distinguish it from other programs in your list.
- Each description should accurately capture the program’s mission, activities, and target population. Vague or generic descriptions will produce less relevant grant matches.
- Location fields should reflect where the program actually delivers services, not where your organization is headquartered, if those differ.
- Budget figures should reflect the program’s actual operating budget where known. If you are uncertain, use your best estimate—you can update this at any time.
A complete and accurate Programs section is one of the most effective ways to improve the relevance of your GrantMatch results. The more detail you provide, the better Que can help match your programs with funders whose priorities and eligibility criteria are a genuine match for your work.
Step 6: Use Programs in GrantMatch
Once you have programs saved in your profile, they are available to use within the GrantMatch workflow. You can use GrantMatch to conduct a search from your program details through the Programs section of your profile.
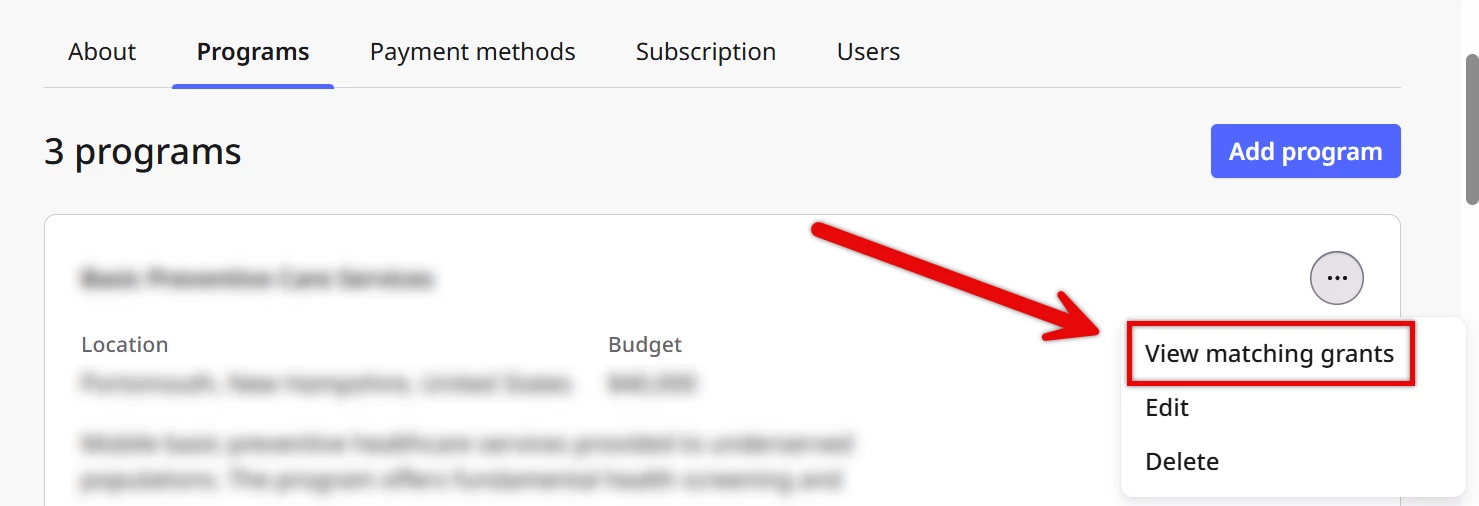
You can also select the “Get Started” button from the home page, or GrantMatch in the left side panel, to begin a new grant search. When you select a specific program—or use the suggested programs available directly in the GrantMatch flow—GrantMatch surfaces grants that align with that program's focus, populations served, and location, rather than returning only general matches for your organization as a whole.
Using GrantMatch without selecting a program will generate matches based on your organization’s general profile. Selecting a specific program generally produces much more targeted and relevant results.
This connection between your Programs section and GrantMatch means that the effort you invest in documenting your programs directly improves the quality of the funding opportunities you see.
Step 7: Edit or Remove Programs
You can edit or remove programs from your profile at any time. Navigate to the Programs section, select the three-dot ellipses next to the program you want to update, and choose to edit or delete. Changes take effect immediately and will be reflected in future GrantMatch sessions.
Keep your Programs list current as your organization's work evolves. Outdated or inactive programs left in your profile can affect the accuracy of your grant matches and may result in suggestions for grants your organization is no longer positioned to pursue.